

Để dựng một VPN Server chạy được cần trải qua khá nhiều bước cấu hình, và do đó, để tiết kiệm thời gian, chi phí, và dễ dàng mở rộng sau này, sau đây chúng ta sẽ áp dụng Docker để dựng một VPN Server.
Cần chuẩn bị những thứ sau đây:
Clients
- Android, IOS, Windows ... tải về tại đây
- Đối với macOS : chúng ta sẽ dùng Tunnelblick
- Đối với Ubuntu: Sử dụng
Network Managerđể connect, xem tại đây
Server:
- Một Linux VPS server(Ubuntu 20.04 LTS), or 14.04, 16.04, 18.04 LTS
- Ram tối thiếu 512 MB
Đối với Server, có nhiều nhà cung cấp như : EC2(Amazon), Compute Engine(Google cloud), Virtual Machines(Microsoft Azure), Linode, ...
Trong bài viết này chúng ta sẽ sử dụng: Google Cloud với Ubuntu 20.04 LTS
Cài đặt Docker:
Nếu đã có sẵn Docker có thể bỏ qua bước này.
Cài đặt Curl
$ sudo apt-get update && sudo apt-get install curl -y

$ curl --version
# curl 7.58.0 (x86_64-pc-linux-gnu)
Cài đặt Docker(stable version) thông qua script: https://get.docker.com
$ curl -fsSL https://get.docker.com -o get-docker.sh && sh get-docker.shThông báo cài đặt thành công:
Client: Docker Engine - Community
 Version:           19.03.13
 API version:       1.40
 Go version:        go1.13.15
 Git commit:        4484c46d9d
 Built:             Wed Sep 16 17:02:36 2020
 OS/Arch:           linux/amd64
 Experimental:      false
Server: Docker Engine - Community
 Engine:
  Version:          19.03.13
  API version:      1.40 (minimum version 1.12)
  Go version:       go1.13.15
  Git commit:       4484c46d9d
  Built:            Wed Sep 16 17:01:06 2020
  OS/Arch:          linux/amd64
  Experimental:     false
 containerd:
  Version:          1.3.7
  GitCommit:        8fba4e9a7d01810a393d5d25a3621dc101981175
 runc:
  Version:          1.0.0-rc10
Kiểm tra Docker version:
$ docker -v
# Docker version 19.03.13, build 4484c46d9d
Khởi động docker service và tự động chạy mỗi khi khi server khởi động
$ sudo systemctl start docker
$ sudo systemctl enable docker
Tạo mới group docker và thêm user hiện tại vào docker group
$ sudo groupadd docker
$ sudo usermod -aG docker ${USER}
Đăng nhập lại vào user hiện tại
$ su -s ${USER}Để chắc chắn docker đã hoạt động hay chưa, chạy lệnh sau đây:
$ docker run hello-worldThông báo việc cài đặt thành công
Hello from Docker!
This message shows that your installation appears to be working correctly.
To generate this message, Docker took the following steps:
 1. The Docker client contacted the Docker daemon.
 2. The Docker daemon pulled the "hello-world" image from the Docker Hub.
    (amd64)
 3. The Docker daemon created a new container from that image which runs the
    executable that produces the output you are currently reading.
 4. The Docker daemon streamed that output to the Docker client, which sent it
    to your terminal.
To try something more ambitious, you can run an Ubuntu container with:
 $ docker run -it ubuntu bash
Share images, automate workflows, and more with a free Docker ID:
 https://hub.docker.com/
For more examples and ideas, visit:
 https://docs.docker.com/get-started/
Một số lỗi thường gặp:
# Got permission denied while trying to connect to the Docker daemon socket at unix:///var/run/docker.sock: Get http://%2Fvar%2Frun%2Fdocker.sock/v1.40/containers/json: dial unix /var/run/docker.sock: connect: permission deniedChạy lệnh sau đây:
$ sudo chown "$USER":"$USER" /home/"$USER"/.docker -R
$ sudo chmod g+rwx "$HOME/.docker" -R
# Permission denied /var/run/docker.sock when running "docker in docker"Chạy lệnh sau đây:
$ sudo chmod 666 /var/run/docker.sockCài đặt OpenVPN
Tiếp theo, chúng ta sẽ cài đặt OpenVPN sử dụng Docker với khả năng mở rộng được nhiều tài khoản hơn, và sử dụng được nhiều ports thay vì sử dụng port mặc định 1194/udp của OpenVPN.
Đầu tiên, tải source code từ github repository
$ git clone https://github.com/kylemanna/docker-openvpn.gitDi chuyển vào thư mục vừa mới tải về:
$ cd docker-openvpn/Build một Docker image, đặt tên cho image với tên openvpn:
$ docker build -t openvpn .
Cần tạo một thư mục để chứa các keys và file config.
$ cd .. && mkdir vpn-data && touch vpn-data/varsTiếp theo, tạo các files config cho OpenVPN, nội dung trong thư mục vpn-data/ sẽ được mapping với /etc/openvpn/ trong docker-container.
Ở đây chúng ta sẽ sử dụng port 3000, có thể thay đổi port, miễn sao không trùng với các port đang dùng.
Thay IP_ADDRESS bằng địa chỉ Public IP của Server, để lấy Public IP
$ dig +short [email protected]
## Get IPv4 ##
$ dig -4 +short [email protected]
## Find IPv6 ##
$ dig -6 +short [email protected]
## OR ##
$ dig TXT +short [email protected] | awk -F'"' '{ print $2}'
Sau đó, chạy lệnh như dưới.
$ docker run -v $PWD/vpn-data:/etc/openvpn --rm openvpn ovpn_genconfig -u udp://IP_ADDRESS:3000Khởi tạo cấu hình thành công:
# Processing PUSH Config: 'block-outside-dns'
# Processing Route Config: '192.168.254.0/24'
# Processing PUSH Config: 'dhcp-option DNS 8.8.8.8'
# Processing PUSH Config: 'dhcp-option DNS 8.8.4.4'
# Processing PUSH Config: 'comp-lzo no'
# Successfully generated config
# Cleaning up before Exit ...

$ ls -liah vpn-data
# drwxr-xr-x  2 root   root   4096 Nov  7 08:35 ccd/
# -rw-r--r--  1 root   root    642 Nov  7 08:35 openvpn.conf
# -rw-r--r--  1 root   root    811 Nov  7 08:35 ovpn_env.sh
#-rw-rw-r--  1 thaidn thaidn    0 Nov  7 08:34 vars
Khởi tạo PKI(Public Key Infrastructure) bao gồm chứng chỉ CA(Certificate Authority) và một private key cho PKI.
$ docker run -v $PWD/vpn-data:/etc/openvpn --rm -it openvpn ovpn_initpki Quá trình khởi tạo sẽ yêu cầu nhập password để bảo vệ CA private key
# Note: using Easy-RSA configuration from: /etc/openvpn/vars
# init-pki complete; you may now create a CA or requests.
# Your newly created PKI dir is: /etc/openvpn/pki
# Note: using Easy-RSA configuration from: /etc/openvpn/vars
# Using SSL: openssl OpenSSL 1.1.1g  21 Apr 2020
# Enter New CA Key Passphrase:
Common Name (eg: your user, host, or server name) [Easy-RSA CA]: test_vpnNhập lại password:
Using configuration from /etc/openvpn/pki/easy-rsa-75.BIhJed/tmp.aiKEnF
Enter pass phrase for /etc/openvpn/pki/private/ca.key:
Check that the request matches the signature
Signature ok
The Subject's Distinguished Name is as follows
commonName            :ASN.1 12:'x.x.x.x'
Certificate is to be certified until Feb 10 08:48:32 2023 GMT (825 days)
Write out database with 1 new entries
Data Base Updated
Note: using Easy-RSA configuration from: /etc/openvpn/vars
Using SSL: openssl OpenSSL 1.1.1g  21 Apr 2020
Using configuration from /etc/openvpn/pki/easy-rsa-151.OBkoDL/tmp.CkaENp
Enter pass phrase for /etc/openvpn/pki/private/ca.key:
An updated CRL has been created.
CRL file: /etc/openvpn/pki/crl.pem
Chạy VPN server dưới port: 3000, tương ứng với port: 1194/udptrong docker container.
$ docker run -v $PWD/vpn-data:/etc/openvpn -d -p 3000:1194/udp --cap-add=NET_ADMIN openvpnKiểm tra xem VPN docker-container đã chạy chưa bằng lệnh sau đây:
$ docker ps

# CONTAINER ID        IMAGE               COMMAND             CREATED             STATUS              PORTS                    NAMES
# 5cce5e6552a5        openvpn              "ovpn_run"          9 minutes ago       Up 9 minutes        0.0.0.0:3000->1194/udp   eager_curie
Để kiểm tra chắc chắn Server đã listen ở port 3000 hay chưa:
$ sudo netstat -tulp | grep docker

# udp        0      0 0.0.0.0:3000            0.0.0.0:*                           13699/docker-proxy
Tiếp theo, cần tạo một username để kết nối tới VPN Server, ở đây là: user_name , thêm tùy chọn nopass để quá trình xác thực không yêu cầu nhập password.
$ docker run -v $PWD/vpn-data:/etc/openvpn --rm -it openvpn easyrsa build-client-full user_name nopassTạo username thành công:
Note: using Easy-RSA configuration from: /etc/openvpn/vars
Using SSL: openssl OpenSSL 1.1.1g  21 Apr 2020
Generating a RSA private key
.......+++++
.................+++++
writing new private key to '/etc/openvpn/pki/easy-rsa-1.dpFHcn/tmp.KoJkHi'
-----
Using configuration from /etc/openvpn/pki/easy-rsa-1.dpFHcn/tmp.NNpDgh
Enter pass phrase for /etc/openvpn/pki/private/ca.key:
Check that the request matches the signature
Signature ok
The Subject's Distinguished Name is as follows
commonName            :ASN.1 12:'user_name'
Certificate is to be certified until Feb 10 08:54:56 2023 GMT (825 days)
Write out database with 1 new entries
Data Base Updated
Cuối cùng, tạo một file config cho Client, file này chúng ta sẽ tải xuống và dùng để kết nối tới VPN Server.
$ docker run -v $PWD/vpn-data:/etc/openvpn --rm openvpn ovpn_getclient user_name > user_name.ovpnTải file user_name.ovpn về máy Client với scp, sftp, ... Huặc có thể copy nội dung file và với tên như trên ở dưới máy Client. Ở đây chúng ta sẽ sử dụng scp để tải về.
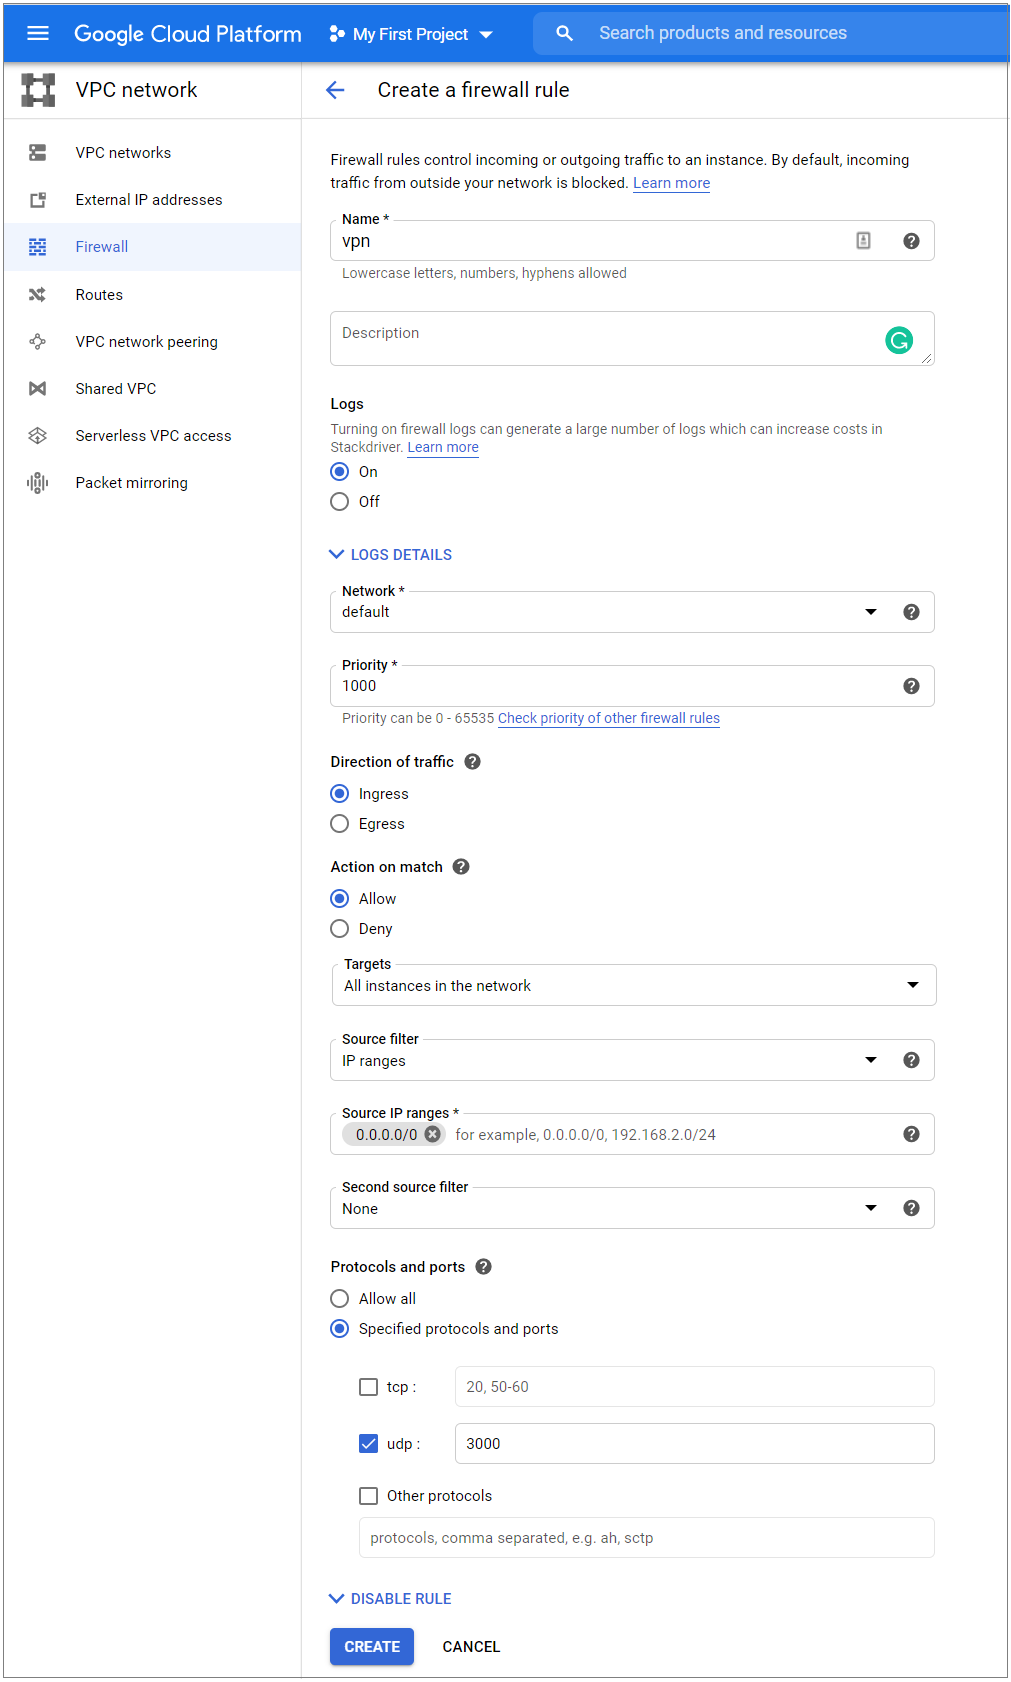
$ scp <user_name>@<server_ip>:$PWD/user_name.ovpn .Để sử dụng được VPN, chúng ta sẽ khai báo một public port UDP:3000
Đối với Google Cloud, ở menu Networking, vào mục: VPC network -> Firewall, sau đó Create firewall rule, và cấu hình như dưới:
Ở Client, dùng OpenVPN client để kết nối tới VPN Server:
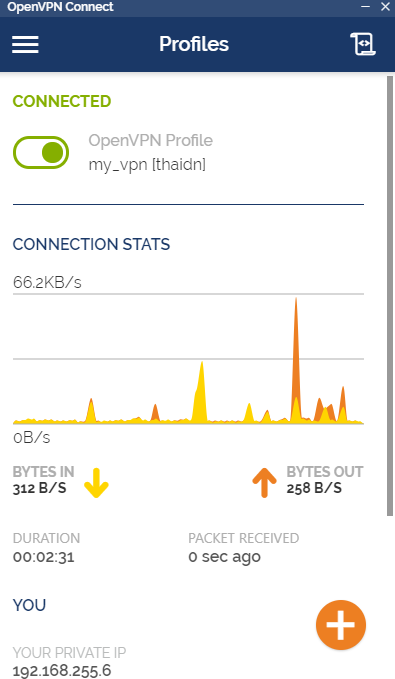
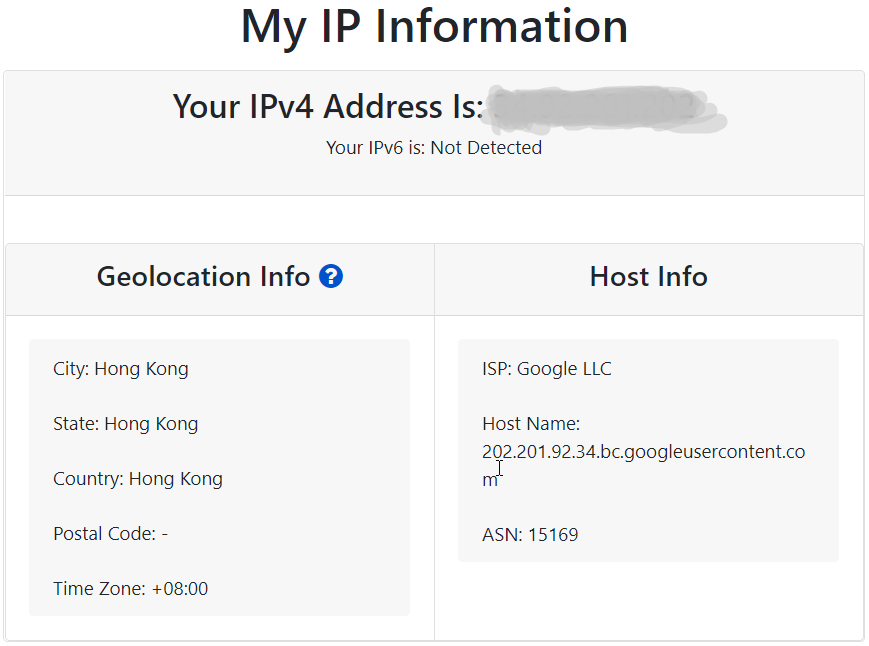
Kết quả:
Ở Server, để kiểm tra VPN logs:
$ docker ps

# CONTAINER ID        IMAGE               COMMAND             CREATED             STATUS              PORTS                    NAMES
# 5cce5e6552a5        openvpn              "ovpn_run"          9 minutes ago       Up 9 minutes        0.0.0.0:3000->1194/udp   eager_curie
$ docker logs -f eager_curieKết quả
Sat Nov  7 04:59:58 2020 x.x.x.x:55601 TLS: Initial packet from [AF_INET]x.x.x.x:55601, sid=560398ab 7c56d0b4
Sat Nov  7 04:59:59 2020 x.x.x.x:55601 VERIFY OK: depth=1, CN=test_vpn
Sat Nov  7 04:59:59 2020 x.x.x.x:55601 VERIFY OK: depth=0, CN=thaidn
Sat Nov  7 04:59:59 2020 x.x.x.x:55601 peer info: IV_VER=3.git:released:662eae9a:Release
Sat Nov  7 04:59:59 2020 x.x.x.x:55601 peer info: IV_PLAT=android
Sat Nov  7 04:59:59 2020 x.x.x.x:55601 peer info: IV_NCP=2
Sat Nov  7 04:59:59 2020 x.x.x.x:55601 peer info: IV_TCPNL=1
Sat Nov  7 04:59:59 2020 x.x.x.x:55601 peer info: IV_PROTO=2
Sat Nov  7 04:59:59 2020 x.x.x.x:55601 peer info: IV_AUTO_SESS=1
Sat Nov  7 04:59:59 2020 x.x.x.x:55601 peer info: IV_GUI_VER=net.openvpn.connect.android_3.2.4-5891
Sat Nov  7 04:59:59 2020 x.x.x.x:55601 peer info: IV_SSO=openurl
Sat Nov  7 04:59:59 2020 x.x.x.x:55601 peer info: IV_BS64DL=1
Sat Nov  7 04:59:59 2020 x.x.x.x:55601 WARNING: 'link-mtu' is used inconsistently, local='link-mtu 1542', remote='link-mtu 1541'
Sat Nov  7 04:59:59 2020 x.x.x.x:55601 WARNING: 'comp-lzo' is present in local config but missing in remote config, local='comp-lzo'
Sat Nov  7 04:59:59 2020 x.x.x.x:55601 Control Channel: TLSv1.3, cipher TLSv1.3 TLS_AES_256_GCM_SHA384, 2048 bit RSA
Sat Nov  7 04:59:59 2020 x.x.x.x:55601 [thaidn] Peer Connection Initiated with [AF_INET]x.x.x.x:55601
Reference:
https://github.com/kylemanna/docker-openvpn
https://devconnected.com/how-to-install-docker-on-ubuntu-18-04-debian-10/
https://www.digitalocean.com/community/questions/how-to-fix-docker-got-permission-denied-while-trying-to-connect-to-the-docker-daemon-socket